
Using an Arduino MKR Vidor4000 board I created a realtime multi-channel audiomixer with nice audio-processing-features.
General background
Sure, digital logic has ones and zeros – but in the right order these two states can have an impact on your sound. I wanted to know how digital logic can be used to change the volume and have influence on the brilliant highs and the chair-shaking bass-sounds of an audio-stream – and how could this can be done in realtime? For a couple of months I worked on an FPGA-based Audioplayer with Equalizer and some more features.
Hardware basis
Several years ago, Arduino published a very-special MKR-board with a quite unusual Arduino-IC-selection: the Arduino MKR Vidor 4000. This board has been presented by Massimo Banzi, a Co-Founder of Arduino. He said “The new MKR Vidor 4000 will finally make FPGA accessible to makers and innovators” but even in 2025 the internet is not showing lot of projects using this board. Of course this was a nice challenge for me: starting a project with a hardware-platform that is not very common – I like challenges 🙂
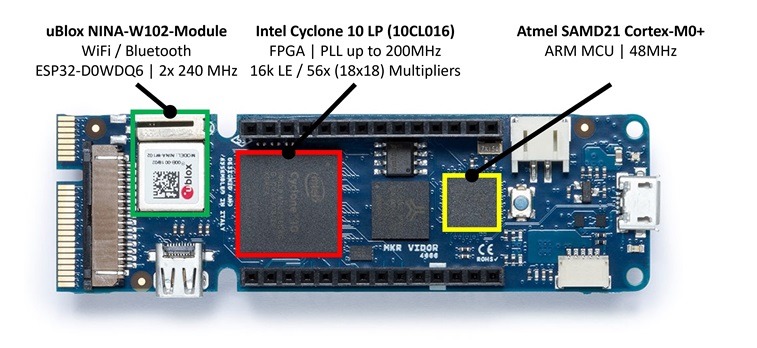
Beside some minor ICs, the board consists of three major devices:
- Microchip SAM D21 32-bit Cortex M0+ Controller
- NINA W102 Module containing an ESP32
- Intel (Altera) Cyclone 10LP with 16kLE
Key features at a glance
- MP3 playback via SD card
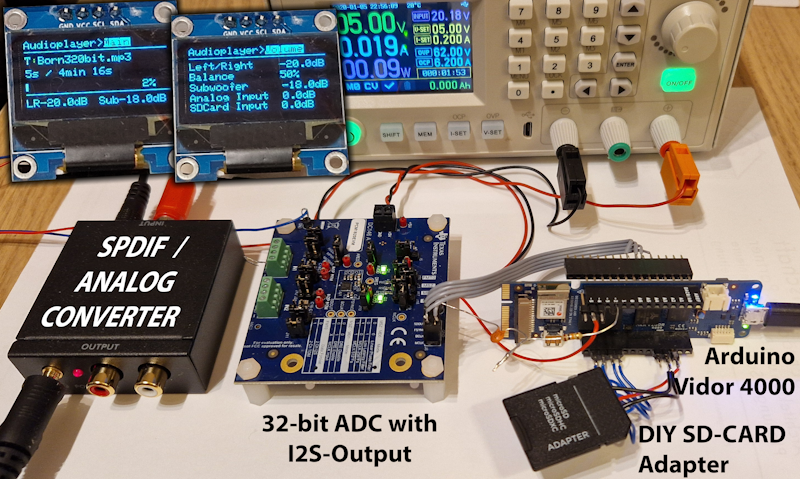
- I2S input from external audio ADC
- SPDIF input (stereo) or input via Behringer UltraNet (16 channels)
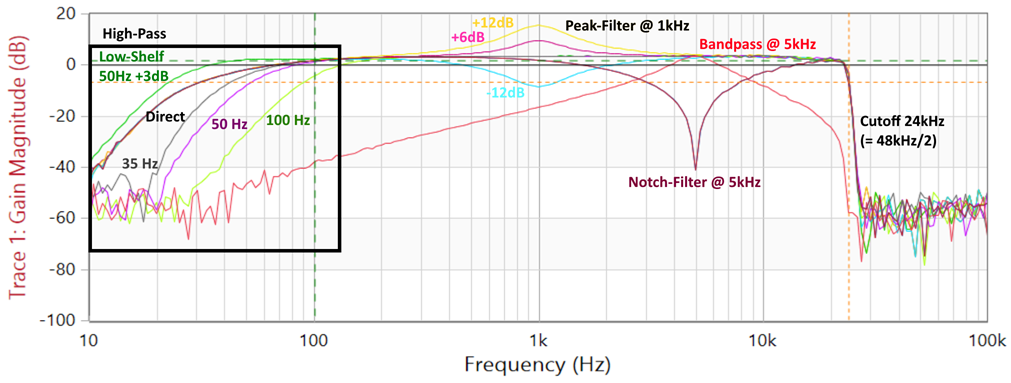
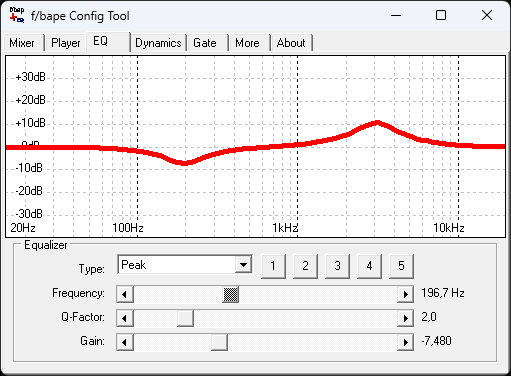
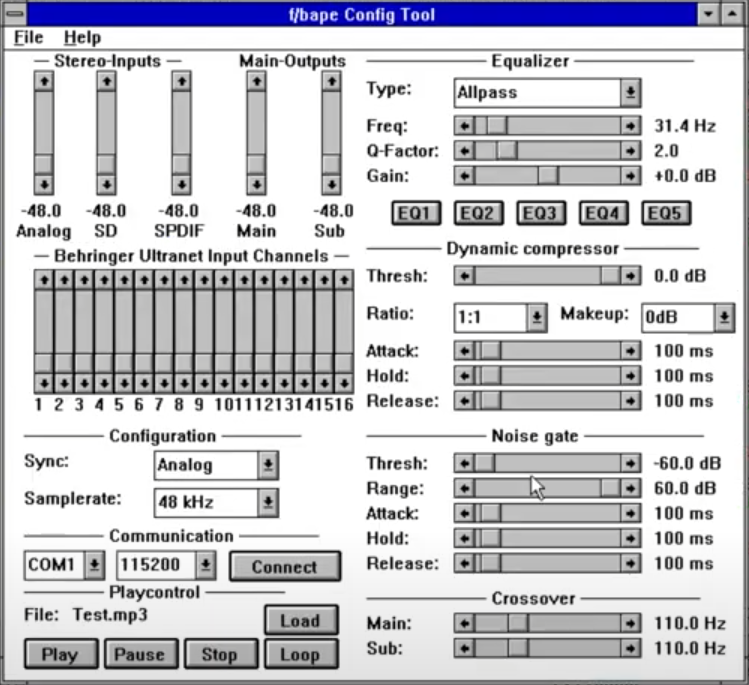
- 5x parametric equalizer
- 24dB/octave Linkwitz-Riley crossover for tweeters and subwoofers
- Noise gate and dynamic audio compression
- Volume control, left/right balancing
- Web server for controlling EQing and other parameters
- Control via ASCII-based commands (or optional MQTT)
- Analog audio output via 3x PDM and/or SPDIF
- Delay from input to output approx. 20µs, therefore real-time processing
Based on the Arduino-documentation, noone should be forced to get in touch with VHDL or the logic itself. The Arduino-guys took some efford to create a predefined logic that interacts with the specific Arduino-Libraries for this MKR-device. So creating an HDMI-device seems to be very simple – but this is not my way… I figured out how to programm all three devices with own code (or logic) so that I could create a full-featured audio-device making use of the benefits of all three types of chips.
Overview
The SAMD21 is used as a USB-2-UART converter for controlling and updating the individual devices. It also contains the bitstream for the Cyclone 10 FPGA, as we do not use the original flash chip in order to make it easier to update the entire system. The device also controls the connected I2C display, external GPIO buffers, and the external ADC. It provides the user with a simple GUI that can be used to set the most important functions without a web server. The FPGA receives audio data via I2S and control data via a UART connection from the NINA W102. It also implements a crossover for the two tweeters and the subwoofer, as well as parametric equalizers and volume controls. The uBlox NINA W102 (ESP32) acts as a WiFi access point with a web server. It can be used to control the volume, select MP3 tracks, adjust the equalizer, and use other functions of the system. The audio data is forwarded to the FPGA via I2S. It can also be used as a Bluetooth A2DP sink.

Software and Logic
In the final design I used the ESP32-chip for high-level-functions, that are not time-criticial:
- reading audio-data from a connected SD-Card
- offering a nice Webinterface to the user via the integrated WiFi
- calculating EQ-parameters
The SAMD21 is used for communicating with a computer via the USB-connector and offers some information when an I2C-display is connected. Furthermore the SAMD21 generates the 48MHz main-clock for the FPGA.
Finally, the FPGA is used to process all incoming audio-data in realtime: the audio-data from SD-card (wave or mp3), an optional connected Stereo-ADC and audio-data from connected external digital-signals like SP/DIF.
Decoding and processing
In the FPGA I’m converting all incoming serial-data of the audio (mainly I2S) to 24-bit-wide logic-vectors. These vectors are fed into a volume-control and afterwards into multiple serialized IIR-filter-blocks for EQing. As the logic-cells of the Cyclone 10LP can be clocked with at least 100MHz, the processing of all individual blocks is done in under 20 microseconds. So I’m able to complete the processing and output the audio-data way before a new audio-sample is received. Hence, we can realize the system in realtime with only one sample of delay.
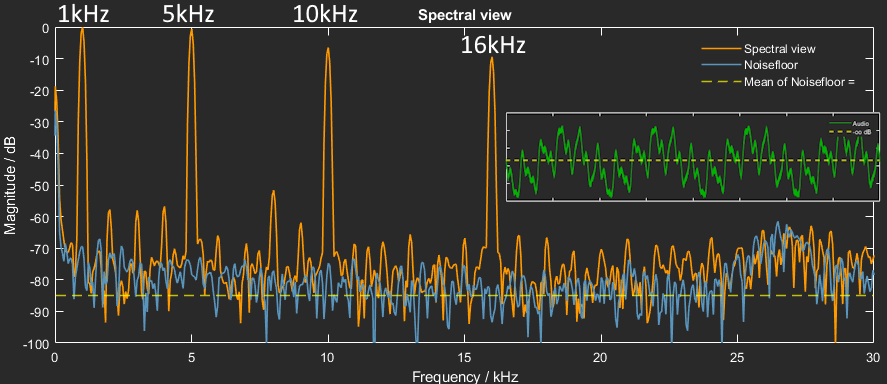
Audioquality
As a DIY project, the audio performance is quite good, but depends on the type of output. When using the digital SPDIF output, the system has the same quality as comparable hi-fi devices. However, when using the inexpensive PDM output, it cannot quite keep up with high-end audio devices. Here is the measurement of a wave file with simultaneous playback of 1kHz, 5kHz, 10kHz, and 16kHz via the PDM:
Used system ressources
Overall, the available system resources have already been utilized quite well. The SAMD21 still has the most free memory. The FPGA is already 95% utilized and offers little room for additions. Unfortunately, the ESP32 also has very little memory with its 2MB, so simultaneous playback of MP3s and Bluetooth A2DP does not seem possible with this model. However, larger models are available with up to 16MB, where this is then possible:
- Atmel SAMD21 ATSAMD21G18A: 26% of program storage space
- Intel Cyclone 10LP 10CL016: 95% logic elements used / 79% embedded multipliers used
- uBlox NINA W102 (ESP32 D0WDQ6): 73% of program storage space
Graphical userinterface
I really went to town with the graphical user interfaces. There is an integrated web server that works on any device. There is also a Windows 10/11 application that sends the settings to the device via USB. But I have also written a Windows 3.11 app and even an OS/2 application for retro fans, which should run on OS/2 Warp 3 (tested) and probably earlier versions as well. It is also possible to control the system remotely via MQTT and UART:
- WiFi via integrated web interface
- UART via FBAPE.EXE, FBAPE311.EXE (Windows 3.11), FBAPECPP.EXE (Windows 3.x) or FBAPEWLO.EXE (OS/2)
- via MQTT
- via ASCII commands via UART

Testing the hardware
To test the system, I connected everything with breadboard connections or direct jumper cables. At higher clock rates, you have to pay attention to signal quality: a 16MHz SPI connection to the SD card requires a little more care than a 1MHz signal.
Youtube-Video
In 2024 I published a Youtube-video about this DIY digital audio-mixer. The final device has five EQs, a noise gate, an audio compressor and up to 22 channels with a total latency of 20.8 microseconds at 48kHz:
More information
If this project is interesting for you, then you might want to have a look at the website of Elektor. Here I’ve written a two-part-article about this system: Elektor-Article. The articles will be published in the march- and april-issues. In the following blog-episodes I will tell you more about specific features of this system.
Sourcecode
The code and some more information are available on my GitHub-repository under GitHub/Audioplayer. Feel free to test it in your own projects and let me know if you have some ideas for improvements.